

Affiliate postback setup
An affiliate postback is the URL Integr8 calls on the publisher’s server when a tracked action occurs. You configure one postback per action type (click, conversion, or event) and Integr8 fires it automatically when the condition is met. This guide walks you through creating one and explains the macros and options you can use.
Before you begin
Section titled “Before you begin”- Have the publisher’s tracking endpoint URL ready, including the click ID parameter name they expect.
- Decide the scope: every offer and publisher, a single offer, a single publisher, or a specific combination.
- Check whether the publisher wants approved conversions only, rejected only, or both.
Create a postback
Section titled “Create a postback”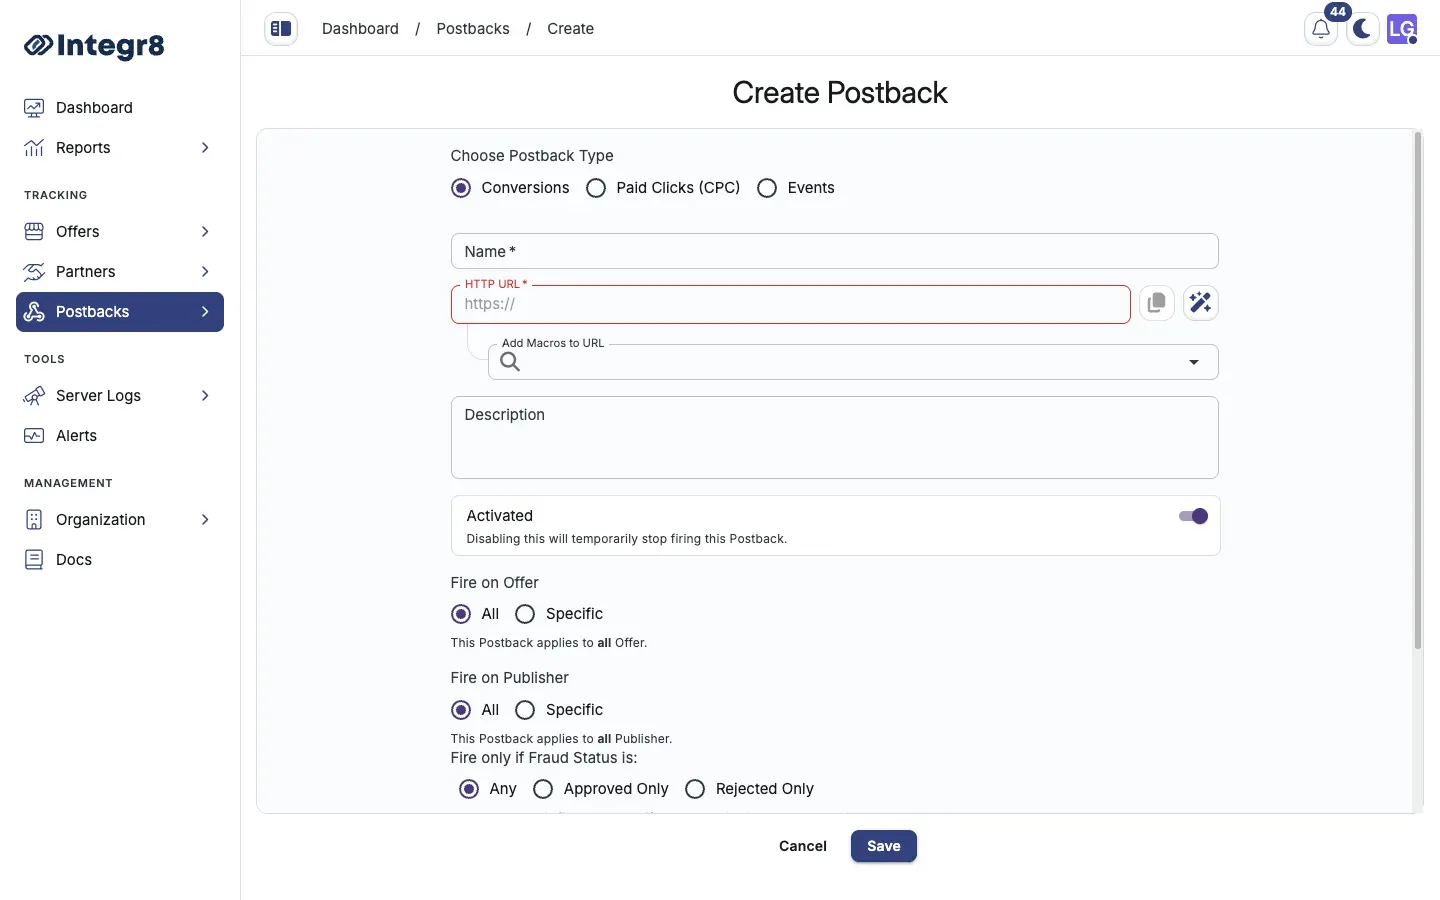
- Go to Postbacks > Postbacks Management and click + Create.
- Pick the Postback Type:
Conversions,Paid Clicks (CPC), orEvents. - Enter a Name to identify this postback.
- Enter the Postback HTTP URL, the publisher’s tracking endpoint. Always include the publisher’s click ID:
https://publisher-track.com/postback?clickid={external_transaction_id}&status={status}
- Map parameters using the macros available in the Add Macros to URL field.
- Set where to apply the Postback offer and publisher:
- Toggle All to apply the postback to all offers and publishers.
- Or pick a specific offer or publisher from the dropdowns.
- Configure the Firing Status:
- Any: fires for both approved and rejected conversions.
- Approved only: fires only on approved conversions. Recommended.
- Rejected only: fires only on rejected conversions.
- Click Save.
Fire only on specific rejection reasons
Section titled “Fire only on specific rejection reasons”In the Rejected Only section, pick the reasons that should trigger the postback. Other rejection reasons are ignored. Use this to forward chargebacks but not policy violations, for example.
Add a delay
Section titled “Add a delay”Set a delay if Integr8 should wait for a third-party fraud check (for example, AppsFlyer or an internal validator) before firing. Minimum delay is 2 minutes.
- Toggle Add Firing Delay in the postback settings.
- Enter the delay duration and unit: minutes or hours.
- Click Save.
Macro reference
Section titled “Macro reference”| Macro | Description |
|---|---|
{transaction_id} |
Integr8’s unique click ID |
{external_transaction_id} |
Publisher’s click ID passed via the tracking link |
{offer_id} |
Offer identifier |
{publisher_id} |
Publisher identifier |
{sub_id} |
Sub-publisher ID |
{payout} |
Publisher payout amount |
{revenue} |
Advertiser revenue amount |
{currency} |
Payout currency |
{status} |
Conversion status: approved or rejected |
{rejection_reason} |
Reason code if the conversion is rejected |
Next steps
Section titled “Next steps”- Verify the postback is firing by checking the logs after a test conversion.
- Push the same data to a CRM by configuring a second postback with your CRM endpoint.